Harden PHP on Cpanel Server with suPHP and open_basedir

If you run a cpanel server and provide hosting services to customers, you really need to take care that one customer should not be able to access another customer’s files. Not doing this will introduce you to a world of pain. Hackers, script kiddies and spammers are the scum of the internet and they do not care how much trouble they cause to others. Your customers may not be malicious themselves but they can also be unaware of their actions in regards to security.

With the popularity of CMS’s like WordPress, Joomla, its very easy to get a website/blog up and running in minutes. For the unaware customer, its also very easy to forget to upgrade their installations and install insecure themes and plugins. These are the main sources for hackers to gain access to their files and account on the server, and if the server is not properly secured, it only takes one customer getting his account compromised to enabling the hacker to access all other files on the server.

Fortunately there’s a way to prevent or at least make it harder for them to do that. We’ll be making use of suPHP and open_basedir.

suPHP

This executes php scripts with the permissions of the script’s owner instead of the user nobody. 

To enable this, apache needs to compiled with mod_suphp. This can be done via easy apache in cpanel.
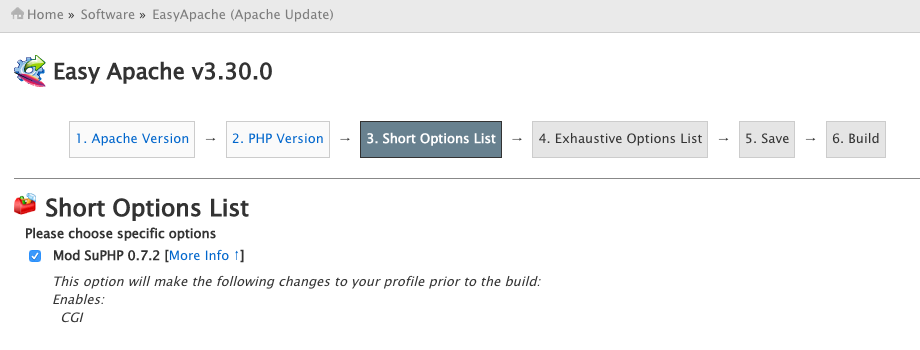
Inside WHM:

– Go to Software >> EasyApache (Apache Update)

– Click on a previously saved profile and customize it, choose your apache and php version. On the next page, make sure Mod suPHP is enabled/ticked.

– Click on save and build. This should take about 5 minutes. Apache is now compiled with suPHP.

easy-apache

open_basedir

This is a PHP directive found in the php.ini file that restricts the running php script to only certain file directories specified in the directive. For cpanel users, this can be set to the /home/, /usr/local/lib, and /tmp directories. To set the open_basedir, you can do it via WHM or from the command line:

Command/Shell:


# vi /usr/local/lib/php.ini

# open_basedir = "/home/:/tmp:/usr/local/lib/"

From WHM:

Go to Service Configuration >> PHP Configuration Editor
Check “Advanced Mode”, find the open_basedir directive and set the values

open_basedir

/usr/local/lib – This area stores the php.ini files and other configurations which would be needed by the running PHP script.

/tmp – This is default area where PHP stores temporary files like sessions, file uploads, etc. So the script would need access to it.

/home – This is normally where a user’s account is stored. If we want to restrict user to its own user directory (/home/username) then each user should have an independent php.ini file specifying the directory in the open_basedir directive.

Disable user’s custom php.ini

suPHP by default loads a user’s custom php.ini stored in their directory. This enables the user to override the global php.ini settings. A malicious user/script could override the global open_basedir value and the above protection will be lost. To prevent this, we have to ask suPHP to load only the main php.ini file:

Open the suPHP configuration file:


# vi /opt/suphp/etc/suphp.conf

And uncomment the following lines:


;application/x-httpd-php=/usr/local/lib/
;application/x-httpd-php4=/usr/local/php4/lib/
;application/x-httpd-php5=/usr/local/lib/

The above lines should read as below:


application/x-httpd-php=/usr/local/lib/
application/x-httpd-php4=/usr/local/php4/lib/
application/x-httpd-php5=/usr/local/lib/

Now, save the file and restart apache:


# service httpd restart

From what I have noticed, with the above settings, a user can still access another user’s files (/home/user2/), but since cpanel sets a 750 (No permission for others) permission on the public_html folder, it cannot access the other user’s files under public_html (where most of their files will be anyway). So, as long as users don’t change their public_html permission and store most of their files inside public_html folder, its an easier way than creating php.ini files for every single user. For me, it works, so its a decision you have to make yourself.


Setup OpenVZ on Centos 6 and create VPS containers

If you have a server and want to divide it into smaller servers (VPS) that can be used for different purposes, this guide will show you how to do that with OpenVZ.

OpenVZ is one of many virtualization systems (Xen, KVM, etc.) that can be used to partition your server into many Linux containers. It is free and very easy to setup. It can only be used to create Linux containers though.

Requirements:

  • SSH access to a physical server
  • At least 2 IP addresses (public if you want it to be accessible across the internet)

This tutorial assumes that you have already installed CentOS 6 on your main server and know how to edit files using vi. This will be called the node.

First, we have to add the OpenVZ yum repo so we can install the kernel using yum


# wget -O /etc/yum.repos.d/openvz.repo http://download.openvz.org/openvz.repo
# rpm --import http://download.openvz.org/RPM-GPG-Key-OpenVZ

Install the openvz kernel using yum install.


# yum install vzkernel

Once the openvz kernel is installed, we have to boot into that kernel and not the centos 6 kernel. Select the boot order, set it to the openvz kernel by changing the default number to the one corresponding to the installed kernel.


# vi /etc/grub/grub.conf

On my system, I have the following contents in the /etc/grub/grun.conf file:


default=0
timeout=5
splashimage=(hd0,0)/boot/grub/splash.xpm.gz
hiddenmenu
title OpenVZ (2.6.32-042stab108.2)
root (hd0,0)
kernel /boot/vmlinuz-2.6.32-042stab108.2 ro root=UUID=ae3594f2-6283-4171-a706-9ecb965fcfd9 rd_NO_LUKS KEYBOARDTYPE=pc KEYTABLE=us LANG=en_US.UTF-8 nodmraid SYSFONT=latarcyrheb-sun16 crashkernel=auto rd_MD_UUID=dba406c1:4bde3b09:0272bd39:a5f39fcc rd_NO_LVM rd_NO_DM rhgb quiet
initrd /boot/initramfs-2.6.32-042stab108.2.img
title CentOS (2.6.32-504.16.2.el6.x86_64)
root (hd0,0)
kernel /boot/vmlinuz-2.6.32-504.16.2.el6.x86_64 ro root=UUID=ae3594f2-6283-4171-a706-9ecb965fcfd9 rd_NO_LUKS KEYBOARDTYPE=pc KEYTABLE=us LANG=en_US.UTF-8 nodmraid SYSFONT=latarcyrheb-sun16 crashkernel=auto rd_MD_UUID=dba406c1:4bde3b09:0272bd39:a5f39fcc rd_NO_LVM rd_NO_DM rhgb quiet
initrd /boot/initramfs-2.6.32-504.16.2.el6.x86_64.img
title CentOS 6 (2.6.32-504.el6.x86_64)
root (hd0,0)
kernel /boot/vmlinuz-2.6.32-504.el6.x86_64 ro root=UUID=ae3594f2-6283-4171-a706-9ecb965fcfd9 rd_NO_LUKS KEYBOARDTYPE=pc KEYTABLE=us LANG=en_US.UTF-8 nodmraid SYSFONT=latarcyrheb-sun16 crashkernel=auto rd_MD_UUID=dba406c1:4bde3b09:0272bd39:a5f39fcc rd_NO_LVM rd_NO_DM rhgb quiet
initrd /boot/initramfs-2.6.32-504.el6.x86_64.img

The default is set to 0, which is the first one in the list.

Next, install the openvz tools and utilities that we will use to control and manage our containers.


# yum install vzctl vzquota vzploop

Make changes to the /etc/sysctl.conf file


# vi /etc/sysctl.conf
net.ipv4.ip_forward = 1
net.ipv4.conf.default.proxy_arp = 0
net.ipv4.conf.all.rp_filter = 1
kernel.sysrq = 1
net.ipv4.conf.default.send_redirects = 1
net.ipv4.conf.all.send_redirects = 0
net.ipv4.icmp_echo_ignore_broadcasts=1
net.ipv4.conf.default.forwarding=1

With OpenVZ we have the option of two filesystems for our containers.

  • simfs – psuedo filesystem that maps the hosts files to the containers
  • ploop – One large file containing all container files

The default filesystem is set to ploop, but for ease of use, we’ll set it to simfs


# vi /etc/vz/vz.conf
VE_LAYOUT=simfs

Save the file and reboot into the new kernel


# reboot

Creating Containers

Now that we have installed the openvz kernel and rebooted into it, we will create our first container.

Select and download a pre-created template from the openvz template website and save it to the /vz/template/cache directory.

We will create a container with the following specs:

Container ID: 110
OS: Centos 6
Hostname: myfirst.vps.com
IP Address: 123.123.123.12
Nameserver (Google’s): 8.8.8.8 and 8.8.4.4
Total CPUs: 2
RAM: 4GB
Disk space: 50GB
SWAP (vswap): 2GB


# vzctl create 110 --ostemplate centos-6-x86_64
# vzctl set 110 --onboot yes --save
# vzctl set 110 --hostname myfirst.vps.com --save
# vzctl set 110 --ipadd 123.123.123.123 --save
# vzctl set 110 --nameserver 8.8.8.8 --nameserver 8.8.4.4 --save
# vzctl set 110 --cpus 2 --save
# vzctl set 110 --ram 4G --save
# vzctl set 110 --diskspace 50G --save
# vzctl set 110 --swap 2G --save
# vzctl start 110

Setting onboot to yes will make sure that the container is started automatically right after the host node is started.

We then set a root password for the newly created container.


# vzctl exec 110 passwd

Now, you can login to your container via SSH or by from the host node by


# vzctl enter 110

You can now enter your container and install anything and do anything as you please. All isolated from your main server.

With OpenVZ you can even change the resource limits of your container without rebooting it using the vzctl command. This can be very handy if you need to avoid any downtime when changing limits.

Below are the file locations of a default configuration:

  • /vz – main folder/partition storing all your container files
  • /vz/private/<Container ID>/ – the files of a particular container, identified by its Container ID
  • /etc/vz/vz.conf – the main configuration file for openvz
  • /etc/vz/conf/<Container ID>.conf – the configuration file of a particular container

Enjoy your new virtual machines!!

Hello world!


<?php

echo "Hello, world!";

?>

After a decade of reading other’s blogs and gaining tons of valuable information, I have finally decided to write my own as well.

As I plan to write mostly tutorials related to web development and server administration, I hope my lack of writing skills does not become a hindrance.