Tutorial: Installing Proxmox VE 6 on Software RAID1 (mdraid)

Proxmox VE is an amazing piece of server hypervisor software that lets you create and manage both VMs and LXC containers through a very user friendly web based GUI. However if you want any form RAID with your drive, the default solution is ZFS RAID and it discourages the use of Linux Software RAID. And with NVMe drives becoming affordable and more commonplace, it offers much better performance compared to SATA or SATA SSDs, but as of now I haven’t found any hardware RAID cards that support NVMe, so hardware RAID is out of the question if you want to use NVMe drives.

I have no experience with ZFS, but from what others say, it requires a lot of RAM and it is suited more towards enterprise (expensive) NVMe drives as it wears out consumer grade NVMe drives very fast.

So, in this guide we will install Proxmox on top of two NVMe drives in linux RAID1 (mdraid) configuration. We will be using UEFI bootloader instead of legacy BIOS.

Debian Installation & MD RAID setup:

We need to install Debian 10 (Buster) first and setup the RAID during the installation process. We cannot use the ISO provided by proxmox, it will not provide you with any options to create a software RAID.

  • Create a 500MB partition on each disk
  • Set the partitions to ESP (EFI system partition). We cannot raid these two partitions. We will later on learn how to load the efi bootloader on both partitions and keep them in sync, so that the system will boot even if one disk fails.
  • Create a partition on each of the disk with on the remaining space and choose “physical volume for raid” as the partition type.
  • Then you need to “Configure software RAID” and select “Create MD device“. We are setting up a mirrored raid (RAID1), so enter “2” for the number of devices and then choose /dev/nvme1n1p1 and /dev/nvme0n1p1




Fix: Laravel Entrust Permissions Caching Issue

Entrust is a great Laravel package to quickly add role based permission access controls to your web application. It has a lot of features and is quite flexible with how and where you want to check for correct permissions, be it in the middleware, blade template or any where in your code.

One problem with first time users of the package is that it is not clear on how to set caching for the roles and permissions. It actually uses the default cache drive set in your .env file, and one would assume it would cache the permissions/roles automatically. Unfortunately this was not the case – on every page load, for every permission/role check, a DB query was being run. For example, in my case, I had a sidebar blade template which would check the permissions and display the link accordingly. That resulted in hundreds of the same query to run on the database.

So, digging into Entrust’s code, I found out that it references a config variable (Config::get(‘cache.ttl’)) that is not available/set in the default Laravel installation. This is called in these two files: EntrustUserTrait.php and EntrustRoleTrait.php.

To fix it, in your config/cache.php you will have to add a new config variable ttl and set to to the number of minutes you want the cache to live, below example sets it to 60 minutes:

ttl => 60

I don’t know why it was not placed in their own config file (config/entrust.php), but for the time being, this should work.

Fix: Failed to access DBM file when using mod_ruid2 and mod_security

If you are using mod_ruid2 and mod_security on your cpanel server, you may come across a problem if one or more of your mod_security rules use the persistent storage (tracking user IP addresses, etc.). This can be seen in your apache error log file at /var/log/apache2/error_log containing the following lines:


ModSecurity: collection_store: Failed to access DBM file "/var/cpanel/secdatadir/ip": Permission denied

This happens when running apache under mod_ruid2, apache cannot access the ip.pag and ip.dir files located in /var/cpanel/secdatadir/ as the apache process runs as the user and not as nobody.

So far, there’s no proper fix for it, with cpanel saying that the fix has to come from mod_security itself.

Meanwhile to get your rules to work, you can change permissions of the the files, so its writeable by everyone.


# chmod 777 /var/cpanel/secdatadir/ip*

Another problem: Cpanel reverting the above changes

During the daily cpanel update process (upcp), the above files are flushed and regenerated causing the permissions to be reset to the original one. To fix this, you will need to create a cpanel hook that runs right after the daily cpanel update process.

Create a script called resetmodsecperm and store it in the /scripts/ folder.


#!/bin/bash
chmod 777 /var/cpanel/secdatadir/ip.*

Make the script executable


# chmod a+x /scripts/resetmodsecperm

Create a cpanel hook


# /usr/local/cpanel/bin/manage_hooks add script /scripts/resetmodsecperm --manual --category System --event upcp --stage post

What the above does is, you are creating a hook that runs the resetmodsecperm script after (–stage post) the cpanel update process (–event upcp).

So with that done, your mod_sec rules will run properly and not throw errors. I know this is a hacky way and chmodding the files 777 could be risky, but this seems to be the only way to make all mod_sec rules work.

UPDATE: With a recent cPanel update, I have noticed a new script has been added and is made to run every two hours. The script basically shrinks the ip.pag and ip.dir files, but this also reverts the permissions of the files and you get the same error as before.

New entry found in crontab:


0 */2 * * * /usr/local/cpanel/scripts/shrink_modsec_ip_database -x 2>&1

So, in your cron tab, have your script run after the above script.


2 */2 * * * /scripts/resetmodsecperm

This will run your script 2 minutes after every time the ip.pag and ip.dir files are recreated.

May/June 2019 UPDATE:

With the recent EasyApache update from cPanel (29/5/2019, 5/6/2019), modsecurity has been updated from 2.9.2 to 2.9.3. Although modsecurity mentions this new update has fixed compatibility issues with modruid2, some rules do not seem to work.

cPanel has also raised an issue regarding the same problem.

So, until the issue is fixed, a work around is to downgrade modsecurity to 2.9.2 and prevent cpanel from upgrading it:


yum remove ea-apache24-mod_security2

yum install ea-apache24-mod_security2-2.9.2-11.11.7.cpanel.x86_64

Append ea-apache24-mod_security2* to the exclude line in /etc/yum.conf 


How to log real visitor IP when using Engintron on Cpanel

If you are using nginx as reverse proxy on your cpanel server through the Engintron plugin, you will need to make some changes to the apache configuration to log the real visitor’s IP instead of the server’s own IP address.

Engintron will install the mod_remoteip during installation and properly make the changes to the apache LogFormat. But the changes don’t seem to persist.

Engintron also provides a “Restore Nginx IP forwarding in Apache” option to restore apache log files through the WHM panel, but the settings are lost when apache rebuilds its configuration at a later time. I have noticed this happening quite often.

For cPanel 74.0.4 and later, you can now make the changes through the WHM GUI. Refer instructions at the end of the post.

So, to make your changes permanent, you’ll have to do the following:

Assuming you are using EasyApache 4, copy the ea4_main.default file to a new file named ea4_main.local. Next time cpanel rebuilds apache configuration, it will use this file instead. This has precedence over the .default file.


# cd /var/cpanel/templates/apache2_4

# cp ea4_main.default ea4_main.local

Make the following changes to the ea4_main.local file

Look for the lines:


LogFormat "%h %l %u %t \"%r\" %>s %b" common
LogFormat "%h %l %u %t \"%r\" %>s %b \"%{Referer}i\" \"%{User-Agent}i\"" combined

And replace it with


LogFormat "%a %l %u %t \"%r\" %>s %b" common
LogFormat "%a %l %u %t \"%r\" %>s %b \"%{Referer}i\" \"%{User-Agent}i\"" combined

Basically, you are replacing %h with %a. Then do a rebuild of the apache config and restart the apache service.


# /scripts/rebuildhttpconfig

# /scripts/restartsrv_apache

Now, your changes will be saved permanently and you’ll get the real visitor’s IP on your log files instead of the server’s IP.

Update (August 2018) : With the release of cPanel 74.0.4 (EA4), you can directly change the Apache LogFormat from within cPanel/WHM.

To change your LogFormat, you can go to Apache Configuration > Global Configuration and replace %h with %a as shown below:

Change apache logformat cpanel 74.04

Once you have saved the changes, you can click on the Rebuild Configuration and Restart Apache button to have the changes come into effect.

You can then delete the /var/cpanel/templates/apache2_4/ea4_main.local file if you have created it before the update.

I have tested that the changes remain after Apache and Engintron updates. Do let me know in the comments if it doesn’t work.

Calculate your tour cost to Bhutan

Planning on visiting Bhutan for your next holiday? If you are not a citizen of India, Bangladesh or Maldives, things aren’t as simple and booking your flight, hotel and applying for a visa.

Firstly, you can only visit Bhutan through a Tourism Council of Bhutan (TCB) licensed tour operator. You will need to contact a tour operator to plan and discuss your tour itinerary. Good thing there are hundreds of tour operators to choose from. Once you have decided on your itinerary , you will be given a price quote by the tour operator. The price will take into account the minimum daily tariff set by the TCB (US$ 200 for off-peak season and US$250 for peak season, per person per day).

Although the minimum daily tariff seem straight forward, there are a lot of other factors such as surcharges, group discounts, duration discounts, child discounts, student discounts, visa waiver, etc that may change the final price.

To make it easier for visitors and tour operators alike, we have made a tool to calculate the tour cost when visiting Bhutan.


Online Hotel Booking in Bhutan

The last one and half year, I have been busy working with our great team at Green e-Solutions on a startup called BookMyTour, that would hopefully change the process of online hotel bookings in Bhutan.

Currently there’s a lack of online avenues where visitors and hotels can accept online payments for hotel room bookings in Bhutan. Although a few hotels do accept bookings from large OTAs like booking.com and other Priceline sites, its not without problems for the hotels in terms of payments (Bhutan has a complex banking system when it involves international money transfers), oversold rooms, etc.

With our new startup, we will concentrate fully on our local hotel/hospitality industry and plan to bring every hotel in Bhutan on board, thereby providing visitors the widest choice from properties ranging from 5 star luxury hotels to our local farm stay properties (farmhouses).

Besides providing online room bookings, we will also publish relevant original content for prospective tourists and visitors to Bhutan through our Bhutan travel guide section, a travel blog and a discussion forum to discuss travel related queries.

If you are planning on visiting Bhutan, do give BookMyTour’s online hotel booking service and let us know about your experience.

Find and delete duplicate files in Bash

For the times that I need to find duplicate files on my linux server and delete them, I go through the following procedure.

md5sum

This command calculates and outputs the md5 checksum of a file. If two files are the same, they will have the same hash.

To, get the md5sum of a file, simply do the following:


# md5sum example.php

# 312e9f7d1d6600989f0d1ac8c72f1de7 example.php

In the above, 312e9f7d1d6600989f0d1ac8c72f1de7  is the md5 hash of the example.php file.

Now, find all files with the exact md5 hash, and store their filenames in a file.


# find /home/ -type f -exec md5sum {} + | grep 312e9f7d1d6600989f0d1ac8c72f1de7 | awk '{ print $2 }' > duplicates.txt

With the above code, we are finding all files that have the md5 hash 312e9f7d1d6600989f0d1ac8c72f1de7, and outputting the second column (which is the filename) to a file called duplicates.txt

Now we loop through the duplicates.txt file, and delete each file one by one.


for f in $(cat duplicates.txt);
do rm -f $f;
done;

How to setup cPanel WHM DNS clusters

Its a good idea to have different physical name servers for your websites for better redundancy. If you are using cPanel to host your websites, it is plain simple to setup a fully working DNS cluster.

In this tutorial, we’ll be setting up a DNS cluster in cPanel.

Besides your main cPanel server, you will need two additional servers or VPS. To lower the risk even more, we can setup these servers from different hosts or locations. As with cPanel, these should be running the CentOS operating system.
You can get cheap $5 per month 512MB 1GB droplets from Digitalocean and install CentOS 6 on it.

Install cPanel DNSONLY

After you have setup your server, its time to install cPanel’s DNSONLY software. Its a watered down version of the normal cPanel/WHM software. You do not even get a DNS zone editor, but that’s fine. You won’t be editing any zones on these servers manually.

cd /root
mkdir cpanel-dnsonly
cd cpanel-dnsonly
curl -o latest-dnsonly -L https://securedownloads.cpanel.net/latest-dnsonly

cPanel states that you need a minimum of 768MB ram to install the software and if your server does not have that required ram, installation will quit with an error. However my DNS servers never use more than 200MB. Maybe it is required for the installation/compiling. Anyway, you can hack the installation process to accept your 512MB ram.

Run the bash script with the keep switch.


sh latest-dnsonly --keep

After running the above command, a new installd directory will be created inside the /root/cpanel-dnsonly directory. You need to open the install file inside and change the following to as below.

my $min_memory_rules = {
    default => 256, # changed this to 256 from 768

After that, you need to run the below file in the same folder (/root/cpanel-dnsonly/installd)

./bootstrap-dnsonly


Setup DNS Cluster

Once the cpanel DNSONLY software has finished installing, you open your browser and go to

https://server-ip:2087

The username will be root  and the password will be your server’s root password.

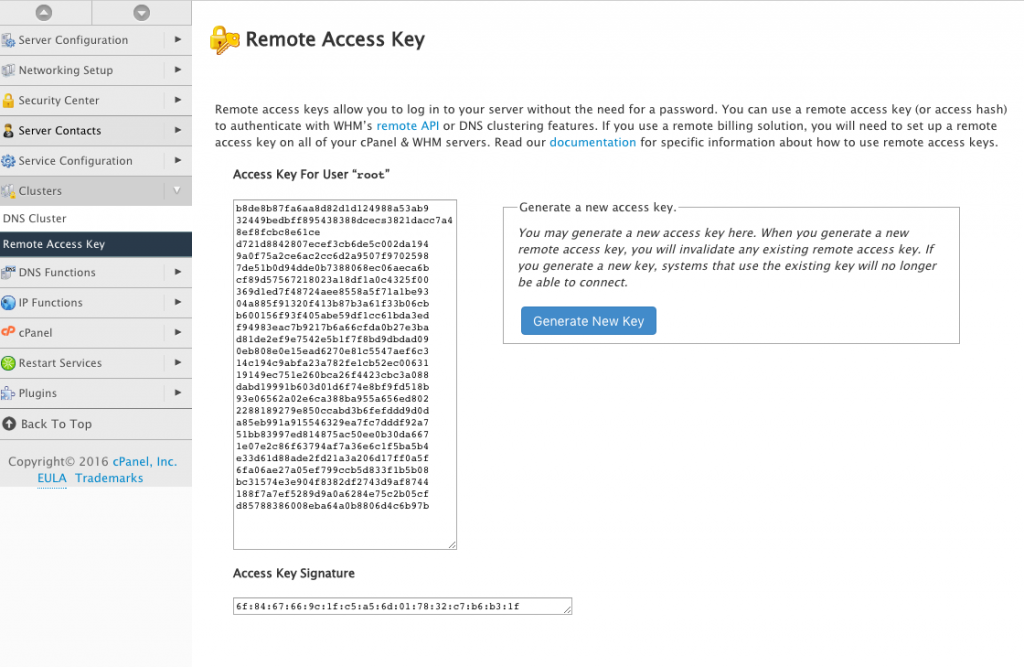
Once logged in, go to Clusters > Remote Access Key and generate a new key. This key will be used by your main server to access the DNS server.

generate-new-key

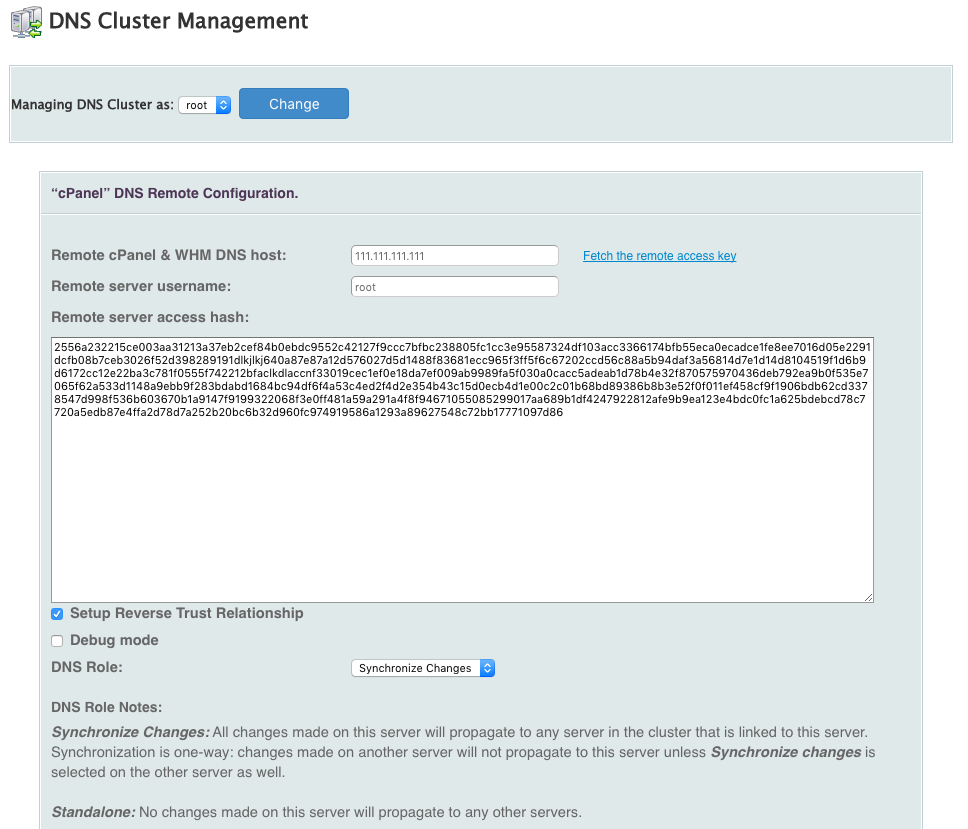
Now login to your main cpanel server and go to Clusters > DNS Cluster. You should now click on Enable DNS clustering  and add a new server to the cluster. Choose cPanel as the backend type. You need to enter your DNS server’s IP address and the remote access key that you copied earlier from your DNS server.

Tick Setup Reverse Trust Relationship and choose Synchronize Changes as the DNS role. With this setting, your main server will push changes to your DNS servers.

add-dns-server

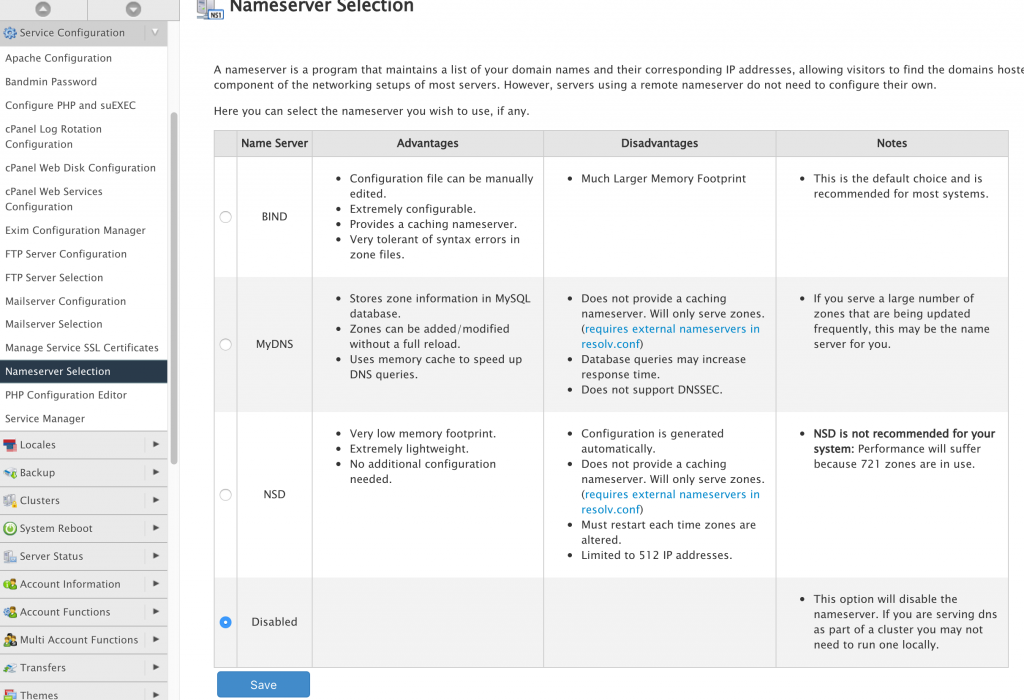
Repeat the process to add the second DNS server. Once that’s done, you can now disable BIND on the main cpanel server by going to Service Configuration > Nameserver Selection. It will not be used as a DNS server any more, but only push DNS records to the separate name servers in the cluster. This way, you will free up resources used by BIND.

disable-bind

You now have multiple DNS servers which automatically stays in sync with your accounts in the cpanel server.

Return view with custom status code in Laravel 5

There are times when you want to render a view, but pass along a custom status code. This is not reflected in the official laravel documentation. You need to set the status code with the setStatusCode() method.

In the following example, am returning a view and passing a 403 status code. Following works with Laravel 5.2


return response()->view('myviewname')->setStatusCode(403);

OpenVZ Tips & Commands

Once you have finished setting up openvz virtualization on your server, below are few commands to control and manage your containers.

Show all containers on the node


#vzlist

CTID NPROC STATUS IP_ADDR HOSTNAME
120 203 running 123.123.123.12 vps1.nodedomain.com
110 101 running 123.123.123.13 vps2.nodedomain.com
150 79 running 123.123.123.15 vps3.nodedomain.com

Start container 110

#vzctl start 110

Stop container 110

#vzctl stop 110

Restart container 110

#vzctl restart 110

Enter container 120


#vzctl enter 120

Show all IPs assigned to containers

#cat /proc/vz/veinfo

120 0 11  123.123.123.12
110 0 182 123.123.123.13 123.123.123.14
150 0 51  123.123.123.15